6. Tutorials#
6.1. Prerequisites#
Before starting with the tutorials, remember to properly read the following documentation sections:
Getting started, to learn how to retrieve the legacy components (hardware, software, tools, etc.). Please note that the HERO installation is only required for the compilation of the software applications;
Environments, to learn about the development environments.
6.2. Assembling an Accelerator-Rich Computer Vision Platform#
This tutorial is meant to guide users in the design and specialization of a computer vision pipeline and covers the following topics:
Design of application-specific accelerators using the AMD Vitis Accelerated Libraries;
System-level integration of the accelerators using the Richie SLD toolchain;
System-level optimization using the Richie SLD toolchain;
FPGA build and deployment (alternatively, RTL simulation is also an option);
Software application design and build;
Exploration flow.
This example can either be run in:
FPGA setup:
Vivado 2019.2 edition+ Zynq UltraScale+ MPSoC ZCU102;RTL simulator:
QuestaSim 10.6.
6.2.1. Description of the Use-Case#
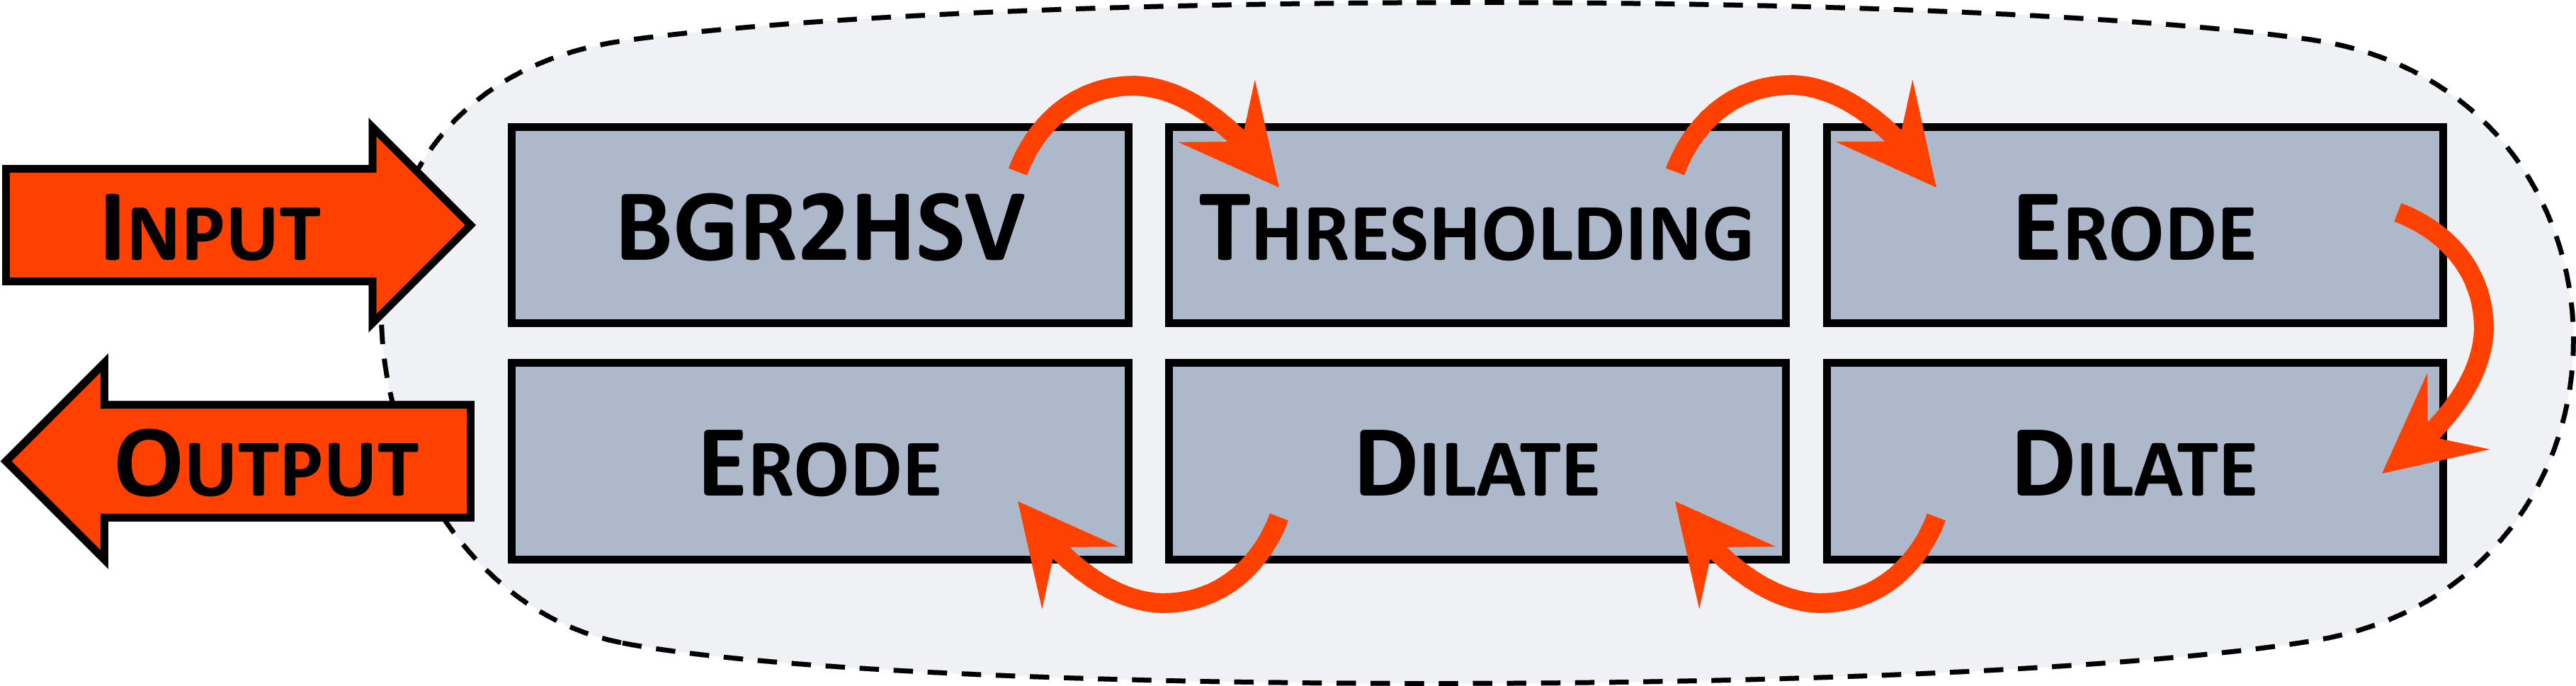
Fig. 6.1 Computer vision workload and execution model.#
The use-case consists of a colour detection pipeline of 6 stages, with the following accelerated functionalities: BGR to HSV conversion, thresholding, erode and dilate. Each stage operates at OI=1 Ops/Bytes on a dataset, which includes 8 images (3-channel in, 1-channel out) at a 256x256 resolution and a memory footprint of 4MB.
More information is available in the Vitis Vision Library documentation.
6.2.2. System-Level Design#
The following steps explain how to employ the toolchain to automatically assemble various instances of the accelerator-rich computer vision platform.
6.2.2.1. Sourcing the Development Environment#
Refer to this section to learn how to source the correct development environment—Vitis HLS Vision Library.
6.2.2.2. Accelerator Design#
During this phase, we will design and synthesize the pipeline components of the computer vision workload using Vitis HLS.
Move to the location of the accelerators sources:
cd $RICHIE_HOME_DIR/hw/accelerators/src
The pipeline components are respectively rgb2hsv_cv, threshold_cv, erode_cv and dilate_cv.
Then pick one pipeline stage at a time, run the following commands and then repeat for the others as well:
cd rgb2hsv_cv
make run get_rtl
6.2.2.3. System Integration#
During this design stage, the toolchain optimizes the HWPE hardware-software interface to enable the communication between the previously designed HLS pipeline components and the Richie platform.
Move to the toolchain location and follow this guide to adequately initialize the toolchain environment.
cd $RICHIE_HOME_DIR/sld-tools/richie-sld-toolchain
The HWPE interface is automatically generated and
to adequately specialize the HWPE interface, the toolchain requires a high-level description
of the accelerated functionality, i.e., an accelerator specification file.
These are collected in the accelerator library under src/accelerators.
We have already prepared an accelerator specification for each of the previously
synthesized HLS pipeline components (rgb2hsv_cv, threshold_cv, erode_cv and dilate_cv).
Finally, the system integration phase is automatically run as part of the Richie SLD flow, thus we can now move to the next phase.
6.2.2.4. System Optimization#
At this stage, the SLD toolchain optimizes the Richie platform to serve the integrated accelerators with
specialized .
This phase is driven by a platform specification file, where are described
the design requirements of the HeSoC components, including the clusters and the memory subsystem, as well as how
accelerators are distributed across the platform.
These are collected in the platform library, under src/platforms.
The optimization phase is also driven by the parameters of the accelerator specification files,
defined in the previous stage.
We have prepard more variants of the platform specification files, which consist of the many instances of the accelerator-rich computer vision platform, which are to be consequently evaluated during the next exploration campaign.
In this specific tutorial, we have formatted each variant name as <accname_nst_ncl_nl1p_nl2p>, where:
accname: accelerator name (e.g.,
color_detect);nst: number of pipeline stages (the workload consists of 6 stages, hence
6stg);ncl: number of clusters (e.g.,
6cl);nl1p: number of L1 memory ports (equal for each cluster, e.g.,
16l1p);nl2p: number of L2 memory ports (e.g.,
16l2p).
6.2.2.5. Running the SLD Flow#
Activate now the Python virtual environment:
source richie-py-env/bin/activate
Then launch the SLD flow with the following command:
cd $RICHIE_HOME_DIR/sld-tools/richie-sld-toolchain
make clean all TARGET_PLATFORM=color_detect_6stg_6cl_16l1p_6l2p
The generated instance is now available under output, including the following locations:
accelerators: the computer vision pipeline and the HWPE hardware-software interface;cluster: SystemVerilog package and accelerator subsystem for the Richie cluster;hesoc: SystemVerilog package and architecture of the Richie HeSoC;ip: HeSoC wrapper for FPGA build;libs: API and low-level RTE components;test: RTL simulation components.
Besides, more information concerning the generation flow is also available here.
6.2.2.6. FPGA Build#
A FPGA bitstream for the AMD Zynq UltraScale+ MPSoC ZCU102 is then easily built, leveraging the AMD Vivado Suite.
cd $RICHIE_HOME_DIR/hw
make fpga
Our FPGA designs have been validated with the Vivado 2019.2 edition.
6.2.3. Software Application#
We can now proceed with the design of the software application, where the computer vision pipeline is executed. Please note that, at this stage, the installation of HERO is mandatory, as it includes the required toolchains and SDK to build the heterogeneous application.
cd $RICHIE_HOME_DIR/sw/benchmarks/richie-acc-bench/pulp/vitis-vision/colordetect/sw
The application can be built with the following command:
make build TARGET=<PATH_TO_SOURCES>
Sources are collected under src/<TARGET_APP>/.
The pipeline dependencies are expressed in the application using the Richie API and
managed by the proxy core and the EU.
Their cooperation enables a fully software-defined communication paradigm, where clusters can dispatch low-cost commands
to convey complex synchronization information, thus guaranteeing flexible control of processing and control tasks,
e.g., multi-cluster synchronization and DMA transfers.
About this, implementation examples of the API and low-level RTE components are available under common/functions/.

Fig. 6.2 Mapping the execution model of the workload to the Richie platform.#
The computer vision benchmark is kept under common/benchmarks/ and is structured as follows:
\(Cluster_{\alpha}\) starts executing, while the others (up to \(cluster_{\omega}\)) sleep until they receive an SoC event with a wake-up command.
\(Proxy_{\alpha}\) initializes and programs the first pipeline stage \(acc_{\alpha , 0}\);
\(Proxy_{\alpha}\) issues an L2-to-L1 transfer of the accelerator data, waits for its completion and finally triggers computation;
Execution of \(acc_{\alpha , 0}\);
Processing termination and then \(EU_{\alpha}\) notifies \(proxy_{\alpha}\);
\(Proxy_{\alpha}\) issues an L1-to-L2 transfer to transfer results back to the L2 memory;
Repeated as soon as the operations of \(acc_{\alpha , 0}\) are terminated.
If the cluster integrates other stages, repeat the same procedure, up to \(acc_{\alpha , i}\);
As soon as \(cluster_{\alpha}\) has no other stages to execute, it forks execution to \(cluster_{\beta}\), which will follow the same execution model.
This process continues until all the stages have been executed.
6.2.4. Exploration Flow#
TBD